

So, you want to learn more about how materials – that’s normal maps and specularity maps in addition to the regular textures, which will now be called “diffuse,” will work when Second Life enables the new features.
http://www.youtube.com/watch?v=Q2H5m9qtGkQ
Well, they’re a way to add eye-popping detail, if you do it right. When the shiny part happens, it’s pretty spectacular.
The tutorial from TheGameCreators.com was my original starting point for a Second Life-specific tut on how to create the extra textures using GIMP that can be used to add depth and shine to objects inworld once the new Materials Project viewer is released (and all the other third party viewers can show the work they’ve already done).
Then I ran across the excellent “Materials for Dummies” entry at Kcreations’ blog at WordPress.com, which was beautifully clear and easy to follow as far as creating a greyscale image to generate a normal map. Those that don’t want to use or learn GIMP can give xNormal a whirl, though the UI looks sort of dopey, like Anakin Skywalker’s Leap Pad (with an early version of the Death Star, apparently).
I’m still hoping that a GIMP plugin called “InsaneBump” which would make the workflow a lot easier will be fixed or clarified for me so that I can get it working, the weird thing is that a discussion thread for it picked up my last blog post on it and reposted the first half there as an unattributed comment. I think somebody got a little SEO-happy trying to get some linky-love, but sucks-boo to them, this blog gets very little traffic! Nyah, nyah!
Anyway, back to tutorials and stuffs.
http://www.youtube.com/watch?v=8Jdo3ZmtPWk
For now, I’ll be using the normalmap plugin, which I got installed fairly handily from the README.txt, though I’d seen VscorpianC’s tutorial before and had to hunt it down for this post. VscorpianC takes the time to go through all the different settings, especally once in the 3D preview window of the plugin – lots of extra settings in there to try. There are other good ones out there on how to install the plugin, too. She sounds very kind and understanding and has a great channel for Blender users, too.
Anyway, I tried to follow the tut that follows earlier and it seems pretty straightforward, but there’s a catch.
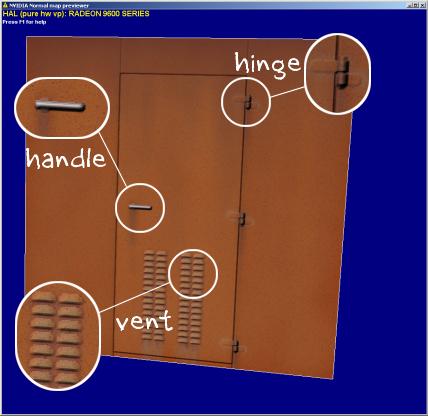
From TheGameCreators.com, by Kravenwolf (his screenshots are hosted by Photobucket so I’m leaving them as hotlinks)
Normal Map Tutorial
First, you’ll need to have the normal map .ddl plugin for GIMP installed. You can find the free download here1. Open your texture in GIMP, and in the layers tab in the toolbox, right-click on the texture and duplicate the image twice so you have three layers of the same texture. Rename each of these layers ‘normal’, ‘diffuse’, and ‘spec’.
2. Select your spec layer, and go to colors > desaturate, to create your specular map. The brighter the specular layer the glossier the texture will appear with the normal map. With the spec layer selected, you can go to colors > brightness-contrast to darken the layer, which will make the normal map less reflective when using the spec map.
3. Now, you’re set up to create your normal map. With the ‘normal’ layer selected, go to filters > map > normalmap. Everything should be set up fine from default. From here, all you really need to mess around with is the scale. The higher the scale, the ‘bumpier’ the normal map will make your texture. The lower the scale, the ‘flatter’ the normal map will make your texture. Set the scale to 10.0, and click 3D preview.
Before you can view a preview of your texture with its normal map, you need to put the layers in their proper places. Give the diffuse map field the diffuse layer, the gloss map field the specular layer, and check the specular lighting option under the bump mapping field to test your specular level. If the texture is too shiny, cancel the normal map, and select your specular layer and go to colors > brightness-contrast and darken the layer. Reshow the normal map again, and it should be less reflective.
4. When you’re satisfied with the preview, click OK in the main normal map tab and GIMP will create your normal map. Obviously you’ll need to save all three layers individually. The easiest way to do this is to click the eyes next to the layers to toggle their visibility. If the eye is showing next to that layer, that is a visible layer. So to save all three images separately, make only one layer visible at a time, and with it selected save the image as a .tga file (_D, _S, _N). GIMP will ask you to ‘merge visible layers’. Do that and it will only save the layer you toggled visible.


See how rough that normal map looks? This tut states to use the photograph or source image as-is with all the colors left in.
According to this tutorial from Kat’s Bit’s, that’s just how NOT to make normal maps from images or photographs
Now she has a Blender focus and is also aimed more at FPS games that take modded content like Doom and Quake and so on – so much more of a “pro game texture artist” point of view. Still, have to admit that her painstaking method with her “heightTemplate” produces a much cleaner normal map. It’s similar to what Kat Fetisov did (who doesn’t seem to be the same as Kat from KatsBits).
GO THERE and study her images, especially the heightTemplate, and the resulting normal map and the final textured image. It’s a much smoother, cleaner, more real representation. She’s got a copyright notice so I won’t copy the images here, but I hope she won’t mind the long quote to get the gist of her method across.
The tools work with 24 bit images using gray scale values to represent height and depth information; black is as far back as you can go and white as far forward – place a blurred white spot on a black background and you create a normal map with a ‘bump’ on it. This means that if we use a ‘mid’ tone gray to represent ‘0’ height/depth, objects that require height (sticking up from a surface) need to have white or light tonal values in them somewhere; objects that sit below a surface need black.
With this in mind look at the image opposite; it’s called a heightTemplate and has been constructed specifically for the creation of a normal map using one of the bump map tools. It differs from the normal gray scale height maps because it doesn’t contain any surface ‘noise’ detailing – scratches, pot marks, etc. – the heightTemplate should only contain basic layout and height/depth information – a ‘block out’ of the physical attributes of the object in question – surface noise and fine details will be added later in game by the heightmap.
I went inworld to the Beta grid yesterday after installing the Materials Project viewer and messed around for a while trying to find a place to work that didn’t return my objects (someday, I need to figure out a “fave work spots” list for Aditi). I had fooled around with the first tut and produced some images that kind of looked right, but didn’t really have the specular one figured out right.
I was trying to emulate the effect I saw in this video, but Kitsune Shan used Mudbox to get her rather spectacular specular and normal maps:
I notice that Kitsune’s
That shiny silver thing she does at the end just by changing one of the settings makes me think that jewelry makers and metalworkers are going to start making stuff that’s only going to be visible to those whose viewer has Advanced Lighting turned on – she demonstrated how the effects vanish for the various textures on her objects when AL is turned off and then back on again.
I messed with it a bit but wasn’t really seeing what all the fuss was about – probably didn’t set enough of a scale to get big crevices on my normal map, and I never did get the specular thing working.
I recently ran across some pretty nice texture-generating methods in a SL class at Builder’s Brewery that results in a texture that’s both bumpy and shiny looking at once that may be workable for those who can’t get advanced lighting working, at least it seemed to work well in class. This was for creating a tileable rock texture:
Create a new 512×512 image (you may want to duplicate it and delete the background)
Go to Filters> Render> >Clouds> Solid noise
Randomize, with a detail of 10-16 or so
Then set your foreground and background colors – use a solid brown (not too dark) and a medium-ish grey.
Go to Colors> Map> Gradient Map
Oooh!
Create a new layer
Go to Filters> Render> Clouds> Solid Noise
Go to Collors> Brightness> Contrast and set contrast to around 40-50 or so.
Hide the top layer by clicking on the eye, then click on the color layer to make it active
Go to Filters> Light and Shadow> Lighting Effects
Go to the Bump Map tab and enable bump mapping. Select the hidden clouds layer as the bump map image
For the materials tab, play with the settings, each between about .20 and .35
For the Lighting tab, try the directional light, move it around, check the intensity.
When satisfied – go to Filters> Map> Make Seamless ( you can also check Tileable way back in the beginning when setting up your clouds, or if you use Plasma).
Save and export in your preferred format. I also ran across a similar method on a GIMP discussion forum, here it is:
Create a new image of any size
Open the Channels dialog box. Select “New Channel”. Name it ‘alpha 1’
Go to Filters–> Render–> Clouds–> Plasma
Go back to the Channels Dialog Box. Select the Red, Green, and Blue channels only
Go to Filters–> Light Effects–> Lighting Effects. Hit the “Light” tab. Under “Type” select “Directional”. Bring the Intensity down to around ‘0.66’
Select the “Bump Map” tab. Check “Enable bump mapping”. Select the item that has ‘alpha 1’ in the “Bumpmap Image” drop down list. Chose “Linear” in the “Curve” drop down list. Hit “OK”
Either way you generate it, the texture looks very rock-like and is shiny – play with the settings until satisfied (Not sure what the environment map setting is, it seems to act like specularity if you don’t load up an RGB image to link to it as in the GIMP docs. Which would make sense given that the Second Life Materials Data page uses “Environment intensity” to describe the alpha section of the Specular map on the table.
2 more videos – not Second Life-related, but good examples of how just adding a bump-map or normal map can increase detail on a 3D model. The original model was probably generated with a high-poly model, then applied on a low poly model.
This last one is almost an hour and a half long, but it’s fascinating; using a technique with a “displacement map,” which looks very much like a greyscale heightmap or bumpmap, a simple torus is turned into a menacing alien spaceship – all the “modeling” is done with a single square texture (there may be more to it than that, it’s an .exr file according to the forum info linked at YouTube).
I know this is an ancient post, but it came up last night when I was searching for information on doing Materials in GIMP. I tried the normalmap plugin, and it worked great! Thanks for the tip 🙂